Hawaiian Yellowfin Poke

Oooooh man… If you ever get your hands on some really good fresh tuna, don’t be afraid – eat it raw! Sushi, Sashimi, Poke – three delicious ways to eat raw fish. Dan and I made our own awesome version of Hawaiian Poke – super easy and no cooking (wink wink) involved.

If you get fresh tuna and absolutely have to cook it, please try to keep it on the rare/medium rare side of done. Overcooked tuna is a sad thing.

Capture

However, if you think you’re up for it – go the raw route!  Poke can be served with rice, salad, cucumbers, sprouts, or anything else you come up with. We ate ours with additional dipping sauces (soy sauce, vinegar, sesame oil/hot sauce), pickled ginger, bean sprouts, and wasabi paste. (We, of course, used Black Market Hot Sauce for this recipe – Chili Garlic Lime to be precise.)

There are so many different recipes for poke – look at a few and come up with your own combination!

Capture1

This recipe would be a S if you follow the Trim Healthy Mama plan.

Hawaiian Yellowfin Poke

  • Servings: 2-4
  • Difficulty: easy
  • Print
Ingredients

  • 1 lb sashimi grade tuna
  • 2-4 green onions – thinly sliced
  • 1/3 bunch cilantro – chopped
  • 1/8-1/4 c toasted sesame oil (sesame oil can be over powering so start with the smaller amount and ad more if desired)
  • 1/4 c dark soy sauce
  • 1/4 c apple cider vinegar
  • 1 T grated fresh ginger
  • 2-3 T hot sauce
  • 2 T sesame seeds

Instructions

  1. With a sharp knife, dice tuna into 1/4 inch cubes.
  2. In a medium bowl, whisk together sesame oil, soy sauce, vinegar, ginger, and hot sauce. Taste and adjust flavors to your preference.
  3. Add tuna and remaining ingredients to marinade.
  4. Cover and let marinade in refrigerator until ready to serve. (Can also be eaten immediately.)

Enjoy!


Dinner with the girls…

My family has scattered to the four corners of the earth. Well – more like the 2.5 corners of the earth. My brother got on a plane to Korea last week and most of my family moved to the middle of Washington on Sunday. It has been a tiring and emotional couple of weeks. I hate saying goodbye, however temporarily or short term. Thankfully two of my sisters are staying on this side of the state, and my best friend Ayla is sticking around for a little while.

One of our goals for the summer is to make dinner together once a week. It will be a challenge because we all have pretty different schedules – but we’ve already succeeded once! Last night we had the welcome addition of the youngest member of Hannah’s host family join us…

For dinner I made fresh gluten-free, corn-free pasta! Ayla actually did all of the hard work, she rolled it all out while I worked on the sauces. Gluten-free dough is much more delicate then regular dough but as long as you pay attention and work a little slower – there shouldn’t be any problems. The nice thing about it is even if it does fall apart you can just squish it back together and start over!

The recipe I used for this pasta is an adaptation of a recipe from the Gluten-Free Girl – Shauna Ahern.

Note: When working with gluten-free flours and adjusting recipes, it is important to use weight instead of volume to measure them. That is why I have the weight of each flour in this recipe. I also used only guar gum instead of a combination of guar and xanthan gum because xanthan gum is a byproduct of corn.

Homemade Gluten Free Pasta

Ingredients

  • 1.25oz amaranth flour
  • 1.25oz millet flour
  • 2.125oz potato starch
  • 2.5oz quinoa flour
  • 3 tsp guar gum
  • 1 tsp fine sea salt
  • 2 large eggs
  • 4 large egg yolks

Directions

  1. Whisk the eggs and egg yolks together in a small bowl.
  2. Combine the dry ingredients in a medium bowl, make a well in center and pour in the whisked eggs and egg yolks.
  3. Stir all ingredients together with a fork until mostly combined.
  4. Using your hands, knead remaining dry ingredients into the dough until it is completely incorporated. (You will know the dough is complete when it feels kind of like play-dough.)
  5. After making the dough – tear the dough into golf ball sized pieces, flatten with your hands and dust with a little millet or quinoa flour to limit the stickiness.
  6. Use either a pasta maker or a rolling pin to roll the dough into thin sheets. Roll each piece as thin as you can before it starts to tear.
  7. After rolling the dough out, use either a knife (or a pizza cutter) or the fettuccine setting on the pasta machine to cut each piece into ribbons of pasta.
  8. Toss the cut pasta with a little flour so that it won’t stick together when you are ready to cook it. Always cook pasta in a large pot with plenty of salted boiling water. You want the pasta to be able to roll around freely and not stick to itself. Salt the water until it tastes like sea water. That gives your pasta extra flavor! This pasta is done cooking very quickly so you want to check it after it’s been cooking for just a few minutes. You don’t want it to be over cooked because it will just turn to mush. When done, drain it and add a little olive oil to prevent it from sticking.

To top the pasta I made two different sauces. The red sauce was made with canned grape tomatoes, tomato paste, sauteed garlic and onions, white wine, spinach, diced zucchini and sea salt. Delish 🙂 I also made a seafood sauce that used two cans each of Trader Joe’s crab and shrimp (including the juices), lots of butter with sauteed garlic, onions, leeks and mushrooms, as well as white wine and sea salt. At the very end I added half a pint of heavy cream and kept it on the heat just long enough to get hot.

Even Hannah liked this sauce and she doesn’t like seafood! We also sauteed some asparagus in butter and salt and ate that on the side.

All in all it was a great evening, especially because we were able to Skype with the family and get a tour of the new house!

I wonder what we’re having for dinner next week?

Cilantro Dip

This. Dip. Is. Amazing. You will never want to use ranch again! Tzatziki sauce either. It’s great with veggies, all kinds of meat, over rice, with chips… pretty much anything you can think of. And if you just add some vinegar it would make a wonderfully creamy salad dressing. You will be eating this by the spoonful and licking the bowl (both of which have been done)!

I made this dip for the first time this weekend, in a gigantic sized batch. This recipe should give you similar results on a smaller scale!

*Please note that this dip is best if made at least one day before serving. The first time I made it I kept adding lime juice and salt, trying to get it to taste like something other than mayo. I put it in the fridge without really being happy with the flavor – but the next day it was wonderful!

Creamy Cilantro Dip/Dressing

Ingredients

  • 1/2 c mayonnaise
  • 1/4 c sour cream
  • 1 tsp lemon juice
  • 2 tsp lime juice
  • 1-2 garlic cloves – minced
  • 6 T chopped fresh cilantro (you can never have to0 much cilantro, so feel free to add more than this)
  • salt and pepper to taste

Instructions

  1. Combine all ingredients in a medium bowl and mix well.
  2. Taste and adjust the lime juice and salt if needed.
  3. Refrigerate over night if able.
  4. Allow dip to become your new addiction!

Serve with anything savory. I mean ANYTHING.

Peanut Sauce!

This peanut sauce is wonderful as a dip with veggies, added to rice, used to marinade chicken and rolled into sushi! It can also be thinned out with a little water and used as a salad dressing. It is so good you’ll want to eat it by the spoonful!

Peanut Sauce

  • 1/2 c natural-style peanut butter
  • 2 Tbsp Hoisin sauce
  • 1 Tbsp soy sauce
  • 1 small garlic clove, mashed to a paste
  • 1 tsp chili-garlic paste
  • 1 Tbsp dark sesame oil
  • 2 Tbsp fresh lime juice
  • 1/4 c sugar
  • 1/4 c rice vinegar
  • 1/4 tsp salt

Dissolve sugar and salt in rice vinegar and mix together with remaining ingredients. Taste and adjust salt or sugar as needed.

Fish Sauce

From Nourishing Traditions by Sally Fallon – on fish sauce in soup

“Another excellent addition to soup is fish sauce. You can make this yourself (see below), or buy a Thai or Vietnamese variety (called nam pla or nuoc mam). These clear brown fermented sauces, made from small whole fish including the head and organs, are rich in iodine and other substances that benefit the thyroid gland. On heating the fishy taste disappears but the nutrients remain. You may add fish sauce to any heated soup instead of salt.”

Fermented Fish Sauce – makes about 2 cups

1½ lbs small fish, including heads, cut up (sardines work well)

3 Tbsp sea salt

2 c. filtered water

2 cloves garlic, mashed

2 bay leaves, crumbled

1 tsp peppercorns

several pieces lemon rind

1 Tbsp tamarind paste (optional)

2 Tbsp whey

Toss fish pieces in salt and place in a wide-mouth, quart-sized mason jar. Press down with a wooden pounder or meat hammer. Mix remaining ingredients and pour over fish. Add additional water to cover fish thoroughly. The top of the liquid should be at least 1 inch below the top of the jar. Cover tightly and leave at room temperature for about three days. Transfer to refrigerator for several weeks. Drain liquid through a strainer and store fish sauce in the refrigerator.

Tomato Sauce and Broken Sinks


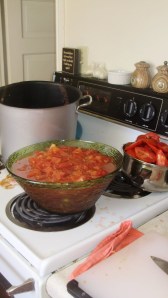
Today I spent a large portion of the morning and afternoon cutting bad spots out of tomatoes, dicing the good parts up, and cooking them down into a yummy tomato sauce. Well – at least that’s what I was doing until some tomatoes got stuck to the bottom of the pan and burnt. And then the pipes under my kitchen sink decided to start spewing water everywhere.
So right now I have a sink full of dishes, a pan that I can’t clean, a trashed kitchen for my landlord to enjoy and bowls full of half cooked tomato sauce sitting on both counters! Pretty soon though – I’ll have lots and lots of home made tomato sauce sitting up in my cupboard!

Plum BBQ Sauce

I had a bunch of plums to use up and I didn’t really want to just make jam with them. My solution? BBQ Sauce! I made this recipe up as I went along and it needs a bit of tweaking – but here is the rough draft to start with.

In order to get the 12 cups of plum “juice” that I ended up using – I simply washed and de-stemmed the plums, piled them in a big pot with a couple of cups of water and then cooked and mashed them until I could strain the seeds, skins and the majority of the pulp out with a pasta strainer. I’m sure there is an easier, more sophisticated way to do this but it worked for me!

12 c. plum juice (very pulpy)
1 c. Worcestershire sauce
1 c. Apple Cider vinegar
3 c. white sugar
3 c. brown sugar
1/3 c. plus 1/8 c. salt (even though it tasted fine when I pulled it off the stove, it got saltier as it sat so I would cut this amount back)
1 Tbsp black pepper
1 Tbsp ground dry mustard
2 Tbsp granulated garlic
1/2 tsp ground cloves
1/2 tsp celery seed
3 fresh garlic cloves – finely chopped

Put everything in a big pot and cook on a medium heat, stirring occasionally to reduce. Reduce to about 2/3 amount – or desired consistency. Taste as it is reducing and adjust flavoring accordingly. Bottle and refrigerate until needed.

Enjoy with chicken or pork or anything else you can come up with!