Hawaiian Yellowfin Poke

Oooooh man… If you ever get your hands on some really good fresh tuna, don’t be afraid – eat it raw! Sushi, Sashimi, Poke – three delicious ways to eat raw fish. Dan and I made our own awesome version of Hawaiian Poke – super easy and no cooking (wink wink) involved.

If you get fresh tuna and absolutely have to cook it, please try to keep it on the rare/medium rare side of done. Overcooked tuna is a sad thing.

Capture

However, if you think you’re up for it – go the raw route!  Poke can be served with rice, salad, cucumbers, sprouts, or anything else you come up with. We ate ours with additional dipping sauces (soy sauce, vinegar, sesame oil/hot sauce), pickled ginger, bean sprouts, and wasabi paste. (We, of course, used Black Market Hot Sauce for this recipe – Chili Garlic Lime to be precise.)

There are so many different recipes for poke – look at a few and come up with your own combination!

Capture1

This recipe would be a S if you follow the Trim Healthy Mama plan.

Hawaiian Yellowfin Poke

  • Servings: 2-4
  • Difficulty: easy
  • Print
Ingredients

  • 1 lb sashimi grade tuna
  • 2-4 green onions – thinly sliced
  • 1/3 bunch cilantro – chopped
  • 1/8-1/4 c toasted sesame oil (sesame oil can be over powering so start with the smaller amount and ad more if desired)
  • 1/4 c dark soy sauce
  • 1/4 c apple cider vinegar
  • 1 T grated fresh ginger
  • 2-3 T hot sauce
  • 2 T sesame seeds

Instructions

  1. With a sharp knife, dice tuna into 1/4 inch cubes.
  2. In a medium bowl, whisk together sesame oil, soy sauce, vinegar, ginger, and hot sauce. Taste and adjust flavors to your preference.
  3. Add tuna and remaining ingredients to marinade.
  4. Cover and let marinade in refrigerator until ready to serve. (Can also be eaten immediately.)

Enjoy!


Satisfying Salmon and Kale

At this time of year, all I want to do is hibernate and drink copious amounts of creamy coffee. Christmas and New Years are past and the cold has officially set in here in the NW. Instead of embracing the grumpy bear persona – I should be taking brisk walks and eating delicious healthy fats and life-giving leafy greens.

Ha ha! Let’s not get too crazy now. One step at a time. Food first, walk later…maybe.

So the real question is: What’s for dinner? Answer: Baked salmon and wilted kale!                 Stay with me. It tastes better than it sounds.          Bake some salmon. Rip up some greens and add a little flavor. Enjoy! It really is that easy.

Wild salmon and kale are both considered super foods! Together they are full of iron, calcium, Omega-3 and Omega-6 fats, and vitamins D, B12, B6, B3, K, A, and C. I’m not even mentioning all of the other crazy nutrients salmon and kale contain.

I love salmon because it is just so satisfying and filling. And I love kale because I’m a little weird and I like the strong, deep, green flavor it has. I also like the fact that kale doesn’t disintegrate and get slimy the way spinach does when it’s cooked for longer than a minute.

20151231_175230This dish is so simple it doesn’t really need a recipe, but I’ll give you one anyway. This is a perfect deep S meal if you follow the Trim Healthy Mama plan.

But first, a few notes from my inner food/health nerd. Some vitamins, including A and K, are fat-soluble – meaning our bodies rely on the presence of fat to properly absorb them. Iron can only be properly absorbed when paired with vitamin C (found in vinegar), and calcium requires vitamin D (found in salmon). When you compare the nutrients found in these two super foods – you find a match made in heaven. You can find links to more detailed explanations at the bottom of the post.

Now the recipe!

Baked Salmon with Wilted Kale

  • Servings: 1+
  • Difficulty: easy
  • Print
Ingredients

  • salmon filet
  • fresh kale – 1-2 large leaves per person
  • salted butter
  • vinegar of choice (flavored, rice wine, apple cider, etc.)
  • toasted sesame oil
  • Braggs Aminos or soy sauce

Instructions

Preheat oven to 350. Place salmon (skin side down) in an oven safe pan and dot generously with butter. Bake for 15 minutes or until the flesh flakes apart easily with a fork. Remove from oven. While salmon is baking, prepare the kale. Begin by washing thoroughly and shaking off excess water. Remove the tough center core from each leaf and cut or rip remaining greens into large bit size pieces. Heat a medium-sized skillet over medium high heat and toss in kale pieces. Stir to heat evenly and continue to cook until kale is slightly wilted. A couple of tablespoons of water can be added if necessary to prevent sticking and burning. Pile wilted kale on a plate and drizzle with a few splashes each of vinegar, sesame oil and aminos. Top with a serving of salmon and enjoy!

Reference Links

The Healthiest Way to Eat Kale

Salmon Nutrients

Nutrient Absorption of Spinach (sharing because it’s similar to kale)

Do you have a favorite way to eat salmon or kale? I’d love to find some new ways to enjoy these super foods!

Shirataki Noodle Stir Fry with Over Easy Egg

Dinner last night was easy, fast, cheap and delicious. My favorite kind of meal! This dish is extremely versatile and only requires one key ingredient – Shirataki noodles! Never heard of them? Me either, until I started following the Trim Healthy Mama Plan a few years ago.

Shirataki noodles are pretty much miracle noodles!

  • Gluten free
  • Dairy free
  • Grain free
  • Zero carbs
  • Zero fat
  • Zero everything

Sounds to good to be true. Shirataki noodles (also known as Konjac/Yam/Glucomannan noodles) are traditional Japanese noodles made primarily from glucumannan, which is a water soluble fiber. Water soluble fiber =  I know what you’re thinking – zero everything means zero flavor too, right? That is true, but it also means they will take on any flavor you choose to give them!

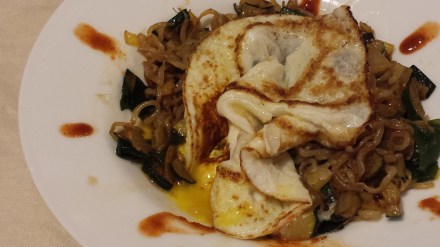
I see a lot of recipes that recommend using Shirataki noodles in Italian style dishes. I prefer to use them primarily in Asian style dishes, since that’s where they originated. So, dinner last night was an Asian noodle stir fry with an over-easy egg on top! I didn’t have any meat in the fridge and I had very few vegetables – so I improvised! Zucchini, onion, dried seaweed, Shirataki noodles, a few sauces, and an egg. Together – a very cheap and satisfying meal.

The key to enjoying these noodles depends on how you cook them.

  1. Rinse
  2. Boil
  3. Dry roast

These three steps are important. When you open a package of Shirataki noodles, they have a strong fishy smell. This smell will disappear in the rinsing/boiling process.

Nearly any kind of meat or vegetable can be added to this dish. Be creative! Just cut everything small and consider cooking the meat separately and adding it at the end. I think a fried egg is a nice addition (and it was my only protein), but you can choose to use a different protein source instead.

As written – this recipe is an S if you are following the THM plan.

*Shameless advertisement warning* I used my boyfriend’s Chili Garlic Lime Hot Sauce for this recipe!

Here’s my recipe for Asian noodle stir fry – Enjoy!konjacnoodleswithfriedegg

Shirataki Noodle Stir Fry with Over Easy Egg

  • Servings: 2
  • Difficulty: easy
  • Print
Ingredients

  • 1(70z) package Shirataki Noodles
  • 1 medium zucchini – diced small
  • 1/2 onion – diced
  • 1 tsp fresh ginger – minced
  • Braggs Aminos or soy sauce
  • butter or coconut oil for frying
  • toasted sesame oil
  • Asian style hot sauce
  • 2 eggs
  • salt and pepper to taste
  • (optional) 1 Tbsp dried seaweed – soaked

Instructions

  1. Bring a medium pot of water to a boil.
  2. Rinse Shirataki noodles in a colander under cold water for at least 1 full minute.
  3. Add noodles to boiling water and cook for 3-4 minutes.
  4. While noodles are boiling, preheat a nonstick frying pan over medium high heat (do not add any oil or fat).
  5. Drain noodles well and add to frying pan. Dry roast for several minutes  until noodles are visibly dry and “squeak” when  stirred.
  6. Move noodles aside so there is space in the middle of the pan. Add a few tablespoons of butter or coconut oil to the center of the pan.
  7. Add diced onions and ginger and saute for a few minutes, until the color starts to change.
  8. Add a few more teaspoons of oil if needed and add the diced zucchini. Continue to saute and then stir to combine all ingredients.
  9. Add several splashes of Braggs Aminos and hot sauce and stir to combine. Taste and adjust seasoning if needed.
  10. Drain seaweed and add to pan. Stir to combine and remove pan from heat.

To fry an over easy egg:

  1. Preheat a small frying pan over medium heat.
  2. Add a small amount of butter or coconut oil and melt.
  3. Crack an egg gently into the pan and cook until the egg whites are opaque and the egg moves freely in the pan.
  4. Carefully flip the egg over and remove from the heat.

Serve stir fry with a drizzle of sesame oil and a few extra drops of hot sauce. Top with the fried egg. Enjoy!


Creamy Onion Coconut Curry Soup

Soup close-upI was inspired today while reading the book Eat Fat, Lose Fat by Dr. Mary Enig & Sally Fallon. This fascinating book takes an in-depth look at good fat (animal fat, nuts, whole dairy, anything from the coconut, etc.) and the positive effect it can have on our weight and health.


diced onion

Halfway through page eight the idea for a delicious new soup struck me and I immediately jumped up and rushed off to make it.

Some trial and error later and I landed on the perfect combination of savory mouth-watering richness. If you love spice: add some cayenne pepper or extra chili flakes. Serve on it’s own or with some warm, crusty bread.

This soup is creamy and satisfying – the perfect dish for a rainy day. I hope you enjoy it as much as I do!


Coconut Onion Curry Soup

  • Servings: 2-4
  • Difficulty: easy
  • Print
Ingredients

  • 1 large onion
  • 1/4 cup butter
  • 1 Tbsp coconut oil
  • 1/4 tsp sea salt
  • 1 tsp yellow curry powder
  • 16 oz chicken stock
  • 1/4 – 1/2 cup canned coconut milk
  • 2-3 pinches red chili flakes
  • salt and pepper to taste

Instructions

  • Melt the butter and coconut oil in a saucepan over medium heat.
  • Finely dice the onion and add to the saucepan.
  • Cook on medium heat until the onion begins to caramelize (about 8 minutes).
  • Once the onions have caramelized slightly, add the curry powder and salt and stir to combine.
  • Add the chicken stock and bring to a simmer. (At this point the soup can be pureed if desired – either in a blender or with an immersion blender.
  • Taste and adjust seasoning if needed.
  • Take soup off the heat and ladle into bowls.
  • Spoon some of the coconut milk into the center of each bowl and lightly swirl in with a spoon.
  • Sprinkle the red chili flakes on top of the soup and serve immediately!

Makes enough for 2 large bowls or 4 appetizers.

Curry Coconut Soup

Winter Blues Solutions

During these cold, gray days of winter it can be extremely easy to fall into a less than cheerful mood. Ok – maybe I’m understating the problem. We can get depressed, grumpy, mad at the world. We can start to go just plain old stir-crazy! Clouds and below freezing temperatures seem to amplify the rest of life’s little problems.

It is important for our sanity (and the sanity of those around us) to go to battle against these bad-mood monsters!
*Check out this post my mom mentioned that takes a creative look at a similar every day challenge many of us have: here.
I decided to write this post because the gray skies of winter have a pretty big affect on my mood. It is much harder to be grumpy when the sun is shining brightly and it’s warm enough for shorts and a tank top! I have to continually fight against my bad mood. Everything I do can affect my mood in some way or another when the sky looks gloomy.

So how do I fight? There are the obvious ways: reading the Bible regularly, spending time in prayer, getting enough sleep (all areas I could improve).
There are other things we can do that may not be quite as obvious… I take liquid Vitamin D and an herbal extract Good Mood Tonic every day. Reducing sugar intake and increasing “good fat” (coconut oil, cod liver oil, etc.) intake is important for energy levels and over all well being. Having a clean (and organized!) living space is key to a positive outlook on life. Consciously enjoying the little things in life is very important! Take the time to enjoy and appreciate those things that we wouldn’t get a chance to do if it was warm and sunny outside. Things such as – savoring a cup of hot tea… Working on a puzzle while the wind howls outside… Filing your taxes in less then fifteen minutes because you live in Washington and don’t have to file state taxes! Walking through a field of untouched snow in the moonlight… Watching the snow falling outside while you fall asleep. Little things can provide some of life greatest joys!

Don’t let those winter doldrums get you down… Fight back with every “little thing” you’ve got!

What are some of the ways that you combat the winter blues?

Good Fat!

Although I promised a while back to do a “mini series” on Why Fat Is Good For You – I never really did anything about it. So consider my previous post (Raw Chocolate Torte) the first of the series!
One aspect of that dessert that I just LOVE is the fact that it is full of good fat. Coconut oil, coconut butter, avocado, nuts – all of these contain fat that is GOOD for you! I’m not going to go into all of the many details surrounding “good” fats and “bad” fats right now – but I will say this… If we don’t eat enough good fat our body hangs on to any excess fat we happen to have because it thinks it’s being deprived.
          I will also give you this excerpt from one of my favorite “real food” cookbooks: Nourishing Traditions by Sally Fallon. She says this in her introduction, “Fats from animals and vegetable sources provide a concentrated source of energy in the diet; they also provide the building blocks for cell membranes and a variety of hormones and hormone-like substances. Fats as part of a meal slow down nutrient absorption so that we can go longer without feeling hungry. In addition, they act as carriers for important fat-soluble vitamins A, D, E and K. Dietary fats are needed fro the conversion of carotene to vitamin A, for mineral absorption and for a host of other processes.”

Think about it – if we don’t eat good fat we can’t absorb all of the vitamins and minerals we need. So – go make that Torte and eat some good fats!

Raw Chocolate Torte

This is something you have to try to believe! Containing only raw ingredients and absolutely no dairy, soy or gluten – this is a dessert that can be enjoyed by nearly everyone (even those who are extremely restricted by their diets). Let me know what you think!

*Not my own recipe but I’m not sure where it’s from originally. If you know I would love to give credit where credit is due!*

Raw Chocolate Torte

  • Servings: 6-8
  • Difficulty: intermediate
  • Print
Crust:

  • 2 c pecans (or pretty much any other nut combo you can think of)
  • 8-10 medjool dates – pitted
  • 1 T coconut oil
  • 1 T cinnamon
  • 1 pinch ground cardamom

In a food processor, grind the nuts until they are fairly well blended. Add the rest of the crust ingredients and process until well combined. Press into a deep dish pie plate and refrigerate while you make the filling.

Filling:

  • 1 c raw cashew butter
  • 1 small avocado (yes – I said avocado)
  • 1/2 c + 2 T raw cocoa powder
  • 1/2 c agave nectar
  • 1/2 c melted coconut butter
  • 1/4 c water
  • 1 T vanilla

Rinse out the food processor. In the food processor, blend all filling ingredients until smooth. Scrape filling into crust and chill for 3-4 hours.

This is torte great on its own or served with berries! Enjoy!


(The best) Piquant Prawn Salad


I love this salad! It’s full of protein, fresh veggies and delicious Asian flavors. This is another recipe from the previously mentioned Thai cook book. I normally leave a few ingredients out but I’ve italicized the adjustments I made so you can see all of the options! (Update: If you are following the Trim Healthy Mama plan, Shirataki noodles would be the perfect replacement for the rice noodles!)

Piquant Prawn Salad

  • Servings: 4-6
  • Difficulty: intermediate
  • Print
Ingredients

  • 7 oz rice vermicelli noddles or Shirataki noodles (follow the first 5 instructions in this recipe if using Shirataki noodles)
  • 8 baby corn cobs – halved
  • 5 oz snow peas
  • 1 T coconut oil (or vegetable oil)
  • 2 garlic cloves – minced
  • 1 inch piece of fresh ginger – peeled and finely chopped
  • 1 fresh red or green chili – seeded and finely chopped
  • 1 lb raw peeled jumbo shrimp
  • 4 green onions – thinly sliced
  • 1 T toasted sesame seeds
  • 1 lemon grass stalk – thinly shredded

For the dressing

  • 1 T fresh chives – chopped
  • 1 T Thai fish sauce
  • 1 tsp soy sauce or Braggs Aminos
  • 3 T peanut oil (or if you love sesame oil as much as I do, use it instead of peanut oil!)
  • 1 tsp sesame oil
  • 2 T rice vinegar

Instructions

  1. Put the rice noodles in a heat proof bowl, cover with boiling water and let sit for 10 minutes.
  2. Drain rice noodles, refresh with cold water, drain again and set aside.
  3. The dressing can be made ahead of time by combining ingredients and either shaking or whisking all of the dressing ingredients together and then setting aside.
  4. Saute, or steam, the snow peas and baby corn and set aside.
  5. Heat the coconut oil in a frying pan (or wok). Add the garlic, ginger and chili and cook for one minute.
  6. Add the shrimp and cook until just pink.
  7. Stir in the green onions, snow peas, baby corn and sesame seeds. Toss lightly to mix.
  8. Add the contents of the pan to the rice noodles.
  9. Pour the dressing on top and toss well.
  10. Sprinkle with lemon grass and chill for one hour before serving.

Enjoy this light flavorful salad!