Shirataki Noodle Stir Fry with Over Easy Egg

Dinner last night was easy, fast, cheap and delicious. My favorite kind of meal! This dish is extremely versatile and only requires one key ingredient – Shirataki noodles! Never heard of them? Me either, until I started following the Trim Healthy Mama Plan a few years ago.

Shirataki noodles are pretty much miracle noodles!

  • Gluten free
  • Dairy free
  • Grain free
  • Zero carbs
  • Zero fat
  • Zero everything

Sounds to good to be true. Shirataki noodles (also known as Konjac/Yam/Glucomannan noodles) are traditional Japanese noodles made primarily from glucumannan, which is a water soluble fiber. Water soluble fiber =  I know what you’re thinking – zero everything means zero flavor too, right? That is true, but it also means they will take on any flavor you choose to give them!

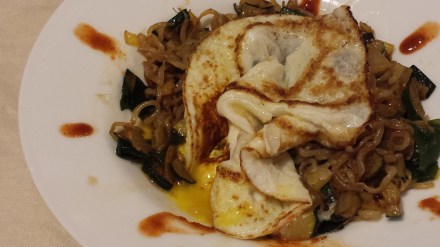
I see a lot of recipes that recommend using Shirataki noodles in Italian style dishes. I prefer to use them primarily in Asian style dishes, since that’s where they originated. So, dinner last night was an Asian noodle stir fry with an over-easy egg on top! I didn’t have any meat in the fridge and I had very few vegetables – so I improvised! Zucchini, onion, dried seaweed, Shirataki noodles, a few sauces, and an egg. Together – a very cheap and satisfying meal.

The key to enjoying these noodles depends on how you cook them.

  1. Rinse
  2. Boil
  3. Dry roast

These three steps are important. When you open a package of Shirataki noodles, they have a strong fishy smell. This smell will disappear in the rinsing/boiling process.

Nearly any kind of meat or vegetable can be added to this dish. Be creative! Just cut everything small and consider cooking the meat separately and adding it at the end. I think a fried egg is a nice addition (and it was my only protein), but you can choose to use a different protein source instead.

As written – this recipe is an S if you are following the THM plan.

*Shameless advertisement warning* I used my boyfriend’s Chili Garlic Lime Hot Sauce for this recipe!

Here’s my recipe for Asian noodle stir fry – Enjoy!konjacnoodleswithfriedegg

Shirataki Noodle Stir Fry with Over Easy Egg

  • Servings: 2
  • Difficulty: easy
  • Print
Ingredients

  • 1(70z) package Shirataki Noodles
  • 1 medium zucchini – diced small
  • 1/2 onion – diced
  • 1 tsp fresh ginger – minced
  • Braggs Aminos or soy sauce
  • butter or coconut oil for frying
  • toasted sesame oil
  • Asian style hot sauce
  • 2 eggs
  • salt and pepper to taste
  • (optional) 1 Tbsp dried seaweed – soaked

Instructions

  1. Bring a medium pot of water to a boil.
  2. Rinse Shirataki noodles in a colander under cold water for at least 1 full minute.
  3. Add noodles to boiling water and cook for 3-4 minutes.
  4. While noodles are boiling, preheat a nonstick frying pan over medium high heat (do not add any oil or fat).
  5. Drain noodles well and add to frying pan. Dry roast for several minutes  until noodles are visibly dry and “squeak” when  stirred.
  6. Move noodles aside so there is space in the middle of the pan. Add a few tablespoons of butter or coconut oil to the center of the pan.
  7. Add diced onions and ginger and saute for a few minutes, until the color starts to change.
  8. Add a few more teaspoons of oil if needed and add the diced zucchini. Continue to saute and then stir to combine all ingredients.
  9. Add several splashes of Braggs Aminos and hot sauce and stir to combine. Taste and adjust seasoning if needed.
  10. Drain seaweed and add to pan. Stir to combine and remove pan from heat.

To fry an over easy egg:

  1. Preheat a small frying pan over medium heat.
  2. Add a small amount of butter or coconut oil and melt.
  3. Crack an egg gently into the pan and cook until the egg whites are opaque and the egg moves freely in the pan.
  4. Carefully flip the egg over and remove from the heat.

Serve stir fry with a drizzle of sesame oil and a few extra drops of hot sauce. Top with the fried egg. Enjoy!


Advertisement

Dinner with the girls…

My family has scattered to the four corners of the earth. Well – more like the 2.5 corners of the earth. My brother got on a plane to Korea last week and most of my family moved to the middle of Washington on Sunday. It has been a tiring and emotional couple of weeks. I hate saying goodbye, however temporarily or short term. Thankfully two of my sisters are staying on this side of the state, and my best friend Ayla is sticking around for a little while.

One of our goals for the summer is to make dinner together once a week. It will be a challenge because we all have pretty different schedules – but we’ve already succeeded once! Last night we had the welcome addition of the youngest member of Hannah’s host family join us…

For dinner I made fresh gluten-free, corn-free pasta! Ayla actually did all of the hard work, she rolled it all out while I worked on the sauces. Gluten-free dough is much more delicate then regular dough but as long as you pay attention and work a little slower – there shouldn’t be any problems. The nice thing about it is even if it does fall apart you can just squish it back together and start over!

The recipe I used for this pasta is an adaptation of a recipe from the Gluten-Free Girl – Shauna Ahern.

Note: When working with gluten-free flours and adjusting recipes, it is important to use weight instead of volume to measure them. That is why I have the weight of each flour in this recipe. I also used only guar gum instead of a combination of guar and xanthan gum because xanthan gum is a byproduct of corn.

Homemade Gluten Free Pasta

Ingredients

  • 1.25oz amaranth flour
  • 1.25oz millet flour
  • 2.125oz potato starch
  • 2.5oz quinoa flour
  • 3 tsp guar gum
  • 1 tsp fine sea salt
  • 2 large eggs
  • 4 large egg yolks

Directions

  1. Whisk the eggs and egg yolks together in a small bowl.
  2. Combine the dry ingredients in a medium bowl, make a well in center and pour in the whisked eggs and egg yolks.
  3. Stir all ingredients together with a fork until mostly combined.
  4. Using your hands, knead remaining dry ingredients into the dough until it is completely incorporated. (You will know the dough is complete when it feels kind of like play-dough.)
  5. After making the dough – tear the dough into golf ball sized pieces, flatten with your hands and dust with a little millet or quinoa flour to limit the stickiness.
  6. Use either a pasta maker or a rolling pin to roll the dough into thin sheets. Roll each piece as thin as you can before it starts to tear.
  7. After rolling the dough out, use either a knife (or a pizza cutter) or the fettuccine setting on the pasta machine to cut each piece into ribbons of pasta.
  8. Toss the cut pasta with a little flour so that it won’t stick together when you are ready to cook it. Always cook pasta in a large pot with plenty of salted boiling water. You want the pasta to be able to roll around freely and not stick to itself. Salt the water until it tastes like sea water. That gives your pasta extra flavor! This pasta is done cooking very quickly so you want to check it after it’s been cooking for just a few minutes. You don’t want it to be over cooked because it will just turn to mush. When done, drain it and add a little olive oil to prevent it from sticking.

To top the pasta I made two different sauces. The red sauce was made with canned grape tomatoes, tomato paste, sauteed garlic and onions, white wine, spinach, diced zucchini and sea salt. Delish 🙂 I also made a seafood sauce that used two cans each of Trader Joe’s crab and shrimp (including the juices), lots of butter with sauteed garlic, onions, leeks and mushrooms, as well as white wine and sea salt. At the very end I added half a pint of heavy cream and kept it on the heat just long enough to get hot.

Even Hannah liked this sauce and she doesn’t like seafood! We also sauteed some asparagus in butter and salt and ate that on the side.

All in all it was a great evening, especially because we were able to Skype with the family and get a tour of the new house!

I wonder what we’re having for dinner next week?